- 本記事のテーマ
- Demo
- 実装動画
- 実装環境
- ソースコード
- PS4コントローラ(dualshock4)から入力できるようにする
- ユニティちゃんを動かすスクリプト
- カメラをキャラクタに追従させるスクリプト
- キャラクターにAnimatorを追加
- スクリプトとAnimatorを反映する
- Objectにtagをつける
- 無効化する処理/パラメータ
- 参考記事
- 関連記事
本記事のテーマ
「ユニティちゃんをPS4コントローラ(dualshock4)で操作する」
下記DEMO動画でユニティちゃんを動かしている処理を紹介する。
左スティック:キャラクターを操作
右スティック:カメラの向きを操作
Demo
実装動画
本記事の実装を録画した動画です。
実装環境
- Ubuntu20.04
- UnityHub2.4.2
- Unity 2019.4.21f1
ソースコード
Githubで管理
・controll-with-dualshock4ブランチ
ブランチの切り替えは下記画像の赤枠をクリックして変更できる。

ユニティちゃんのImport
ユニティちゃんのモデルをダウンロードする。
下記サイトの右上のDATADOWNLOADをクリックする。
ページ下のユニティちゃんライセンスに同意しましたにチェックをしデータをダウンロードをクリック。
すると、下記のページに移動する。

今回はSDユニティちゃん3Dモデルデータを使用する。

ダウンロードフォルダに下記のような名前のパッケージがあると思う。
これらがUnityで使用するpackageになる。
・ユニティちゃん
SD_UnityChan-1.unitypackage
UnityへPackageをインストールする
[Assets]->[Import Package]->[Custom Package...]

DownloadsファルダからSD_UnityChan-1.unitypackageをインストールする。
するとおそらく、下記のような赤色のメッセージが出てくる。

Assets\unity-chan!\Unity-chan! Model\Scripts\AutoBlink.cs(8,23): error CS0234: The type or namespace name 'Policy' does not exist in the namespace 'System.Security' (are you missing an assembly reference?)
下記のサイトを参考に解決できる。
【Unity】Unity-Chan!(ユニティちゃん)でCS0234エラーが発生したときの調査結果と解決方法 - Qiita
することは、
「Edit」→「Project Settings」→「Player」の
Other Settings、ConfigurationsのApi Compatibillity Levelが.NET Standard 2.0になっているので、NET 4.xに変更する

ユニティちゃんを配置する
Unity画面下部のProject画面からユニティちゃんのモデルを探す。
[Assets]->[UnityChan]->[SD_unitychan]->[Prefabs]->[SD_unitychan_humanoid]
SD_unitychan_humanoidをUnity画面左のHierarchy画面にドラッグ&ドロップする。

そして、ユニティちゃんが落ちないようにHierarchy画面で右クリック→3D Object→Planeを選択して生成する。

PS4コントローラ(dualshock4)から入力できるようにする
Unityでの入力設定はEdit→ProjectSettings→ImputMangerで行います。
新しい入力を追加する場合はSize欄の値を増やします。
今回、左スティックと右スティックを使います。
左スティックはHorizontal, Verticalという名前で存在していたので右スティックのRightHorizontal, RightVerticalの二つ分を追加するためにSizeの値は18→20に増やしました。
パラメータは下記の画像のように設定してください。
・RightHorizontal, RightVertical
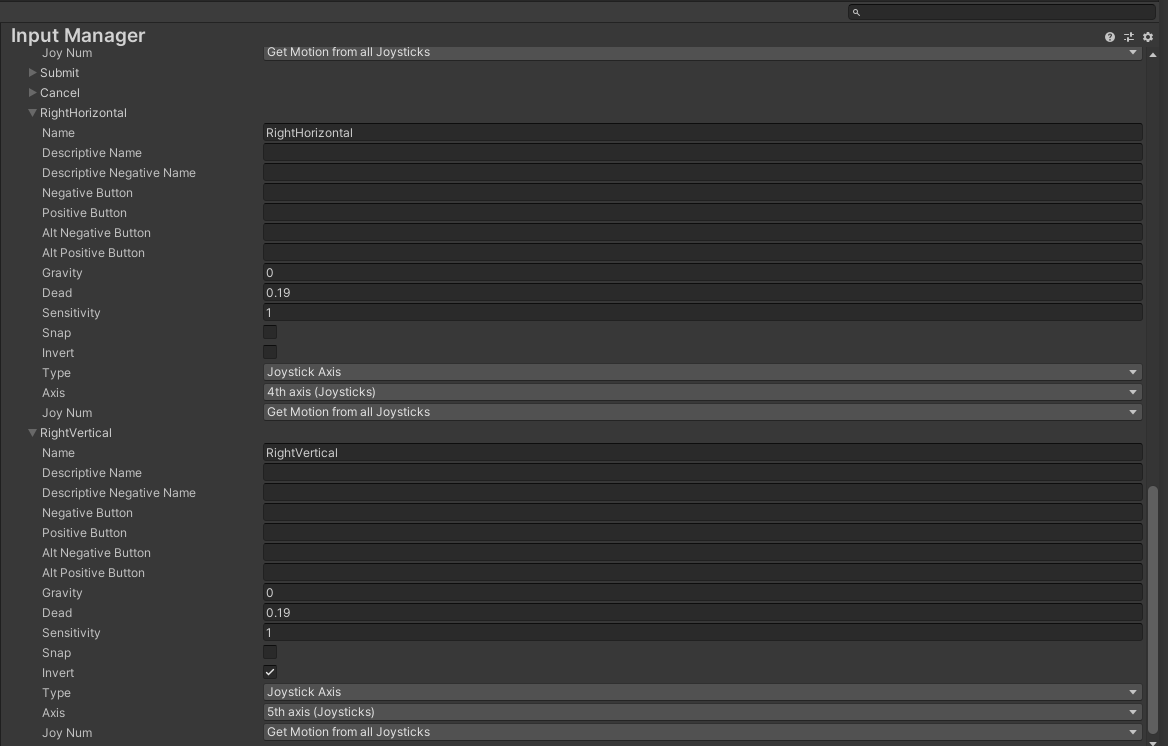
・Horizontal, Vertical

ユニティちゃんを動かすスクリプト
PlayerController.cs
▶クリックでソースコードを展開
using System.Collections;
using System.Collections.Generic;
using UnityEngine;
public class PlayerController : MonoBehaviour
{
public float moveSpeed = 2.0f;
public float rotationSpeed = 360.0f;
GameObject camera; // 外部のオブジェクトを参照する
Animator animator;
// Start is called before the first frame update
void Start()
{
camera = GameObject.FindGameObjectWithTag("MainCamera");
animator = this.GetComponentInChildren<Animator>();
}
// Update is called once per frame
void Update()
{
// Debug.Log(Input.GetAxis("D-pad X"));
// Debug.Log(Input.GetAxis("D-pad Y"));
// ゲームパッドの左スティックのベクトルを取得する
Vector3 direction = new Vector3(Input.GetAxis("Horizontal"), 0, Input.GetAxis("Vertical"));
// 他のオブジェクトのスクリプトを読み込む(スクリプトはクラス扱い)
CameraController cameraScript = camera.GetComponent<CameraController >();
// カメラのY軸角度から回転行列を生成する
Quaternion rot = Quaternion.Euler(0, cameraScript.cameraRotation.y * Mathf.Rad2Deg + 90, 0);
// 逆行列を生成する
Matrix4x4 m = Matrix4x4.TRS(Vector3.zero, rot, Vector3.one);
Matrix4x4 inv = m.inverse;
// 回転行列をかけたベクトルに変換する
direction = inv.MultiplyVector(direction);
if (direction.magnitude > 0.001f)
{
// Slerpは球面線形補間、Vector3.Angleは二点間の角度(degree)を返す
Vector3 forward = Vector3.Slerp(this.transform.forward, direction, rotationSpeed * Time.deltaTime / Vector3.Angle(this.transform.forward, direction));
// ベクトル方向へ向かせる
transform.LookAt(this.transform.position + forward);
}
// 座標移動させる
transform.position += direction * moveSpeed * Time.deltaTime;
// アニメーターコントローラへ値を渡す
animator.SetFloat("Blend", direction.magnitude);
// if (Input.GetKey("joystick button 0")) {
// animator.SetBool("is_jumping", true);
// } else {
// animator.SetBool("is_jumping", false);
// }
if(Input.GetKey("space")){
Debug.Log("Pushed Tab");
}
}
}
カメラをキャラクタに追従させるスクリプト
CameraController.cs
▶クリックでソースコードを展開
using System.Collections;
using System.Collections.Generic;
using UnityEngine;

public class CameraController : MonoBehaviour
{
    // 外部オブジェクトの参照
    GameObject player;

    public Vector3 cameraRotation = new Vector3();
    Vector3 currentCamRotation = new Vector3();

    public float dist = 4.0f;
    Vector3 currentLookAtPos = new Vector3();

    // Start is called before the first frame update
    void Start()
    {
        player = GameObject.FindGameObjectWithTag("unitychan");
    }

    // Update is called once per frame
    void Update()
    {
        // ゲームパッド右スティックからの値を加算する
        cameraRotation += new Vector3(-Input.GetAxis("RightVertical"), -Input.GetAxis("RightHorizontal"), 0) * 2.0f * Time.deltaTime;

        // X軸回転の制限
        // Default: Mathf.Clamp(cameraRotation.x, 15 * Mathf.Deg2Rad, 60 * Mathf.Deg2Rad);
        cameraRotation.x = Mathf.Clamp(cameraRotation.x, 0 * Mathf.Deg2Rad, 60 * Mathf.Deg2Rad);

        // 遅延用の角度との差分をとる
        Vector3 diff = cameraRotation - currentCamRotation;
        currentCamRotation += WrapAngle(diff) * 0.2f;

        // 角度からベクトルを計算する
        Vector3 craneVec = new Vector3
        (
            Mathf.Cos(currentCamRotation.x) * Mathf.Cos(currentCamRotation.y),
            Mathf.Sin(currentCamRotation.x),
            Mathf.Cos(currentCamRotation.x) * Mathf.Sin(currentCamRotation.y)
        );

        // 注視点の座標
        Vector3 lookAtPos = player.transform.position + new Vector3(0, 1, 0);

        currentLookAtPos += (lookAtPos - currentLookAtPos) * 0.2f;

        // カメラの座標を更新する
        this.transform.position = currentLookAtPos + craneVec * dist;

        // プレイヤーの座標にカメラを向ける(これは最後にする)
        this.transform.LookAt(currentLookAtPos);
    }

    // 角度を0~360°に収める関数
    Vector3 WrapAngle(Vector3 vector)
    {
        vector.x %= Mathf.PI * 2;
        vector.y %= Mathf.PI * 2;
        vector.z %= Mathf.PI * 2;

        return vector;
    }
}
キャラクターにAnimatorを追加
今回はBrendTreeを使用します。
Projectsの下にAnimatorsディレクトリを作成し、その中で右クリック→Create→Animator Controllerを新規作成する。
名前はUnitychanAnimatorとしました。
(ディレクトリは作成しなくても問題ありません)

オレンジのBrendTreeをダブルクリックします。
次にBrendTreeを選択してInspector内のMotionにStanding@loopとRunning@loopを追加します。
(genericとhumaroidの2つがありますがhumaroidの方を選択します)

スクリプトとAnimatorを反映する
【スクリプト】
・PleyerController.cs
SD_unitychan_humanoidのInspector画面へドラッグ・アンド・ドロップする。
・CameraController.cs
MainCamera.csのInspector画面へドラッグ・アンド・ドロップする。
【Animator】
・UnitychanAnimator
SD_unitychan_humanoidのInspector画面→AnimatorのControllerに使用されているAnimatorを作成したものに変更する。
歯車をクリックしてUnitchanAnimatorを選択する。
Objectにtagをつける
CameraControllerのStartクラスの中に以下の処理があります。
この処理はカメラがユニティちゃんに追従するためにユニティちゃんのオブジェクトを取得しています。
取得の仕方はObject名で取得する「GameObject.Find()」などいくつかありますが今回はTagからObjectを取得します。
そのためにまずはSD_unitychan_humanoidにTagを付けないといけません。
画像にある、TagがUntagged担っていると思いますのでここをクリックして"Add Tag"を選択します。

すると以下のような画面に変わりますので"+"ボタンを押して、unitychanという名前で追加してください。

最後にもう一度SD_unitychan_humanoidのInspector画面に戻り、Tagをunitychanに変更して保存すると終了です。

無効化する処理/パラメータ
・SD_unitychan_humanoidにデフォルトでattachされているスクリプトを無効化する。

・FaceUpdate.csの処理の一部をコメントアウトする
自作のAnimatorに変更すると出現するエラーに対応する処理をコメントアウトします。
	void ChangeFace (string str)
		{
			isKeepFace = true;
			current = 1;
			// anim.CrossFade (str, 0);
		}
以上で実装は修了になります。
再生ボタンを押下するとコントローラに反応してユニティちゃんが動き出すと思います。
もし、動かない場合はコメント欄にて報告して頂けますと助かります。
参考記事
Unity: キャラクターとカメラ | とあるデザイナーのテクニカルノート
関連記事